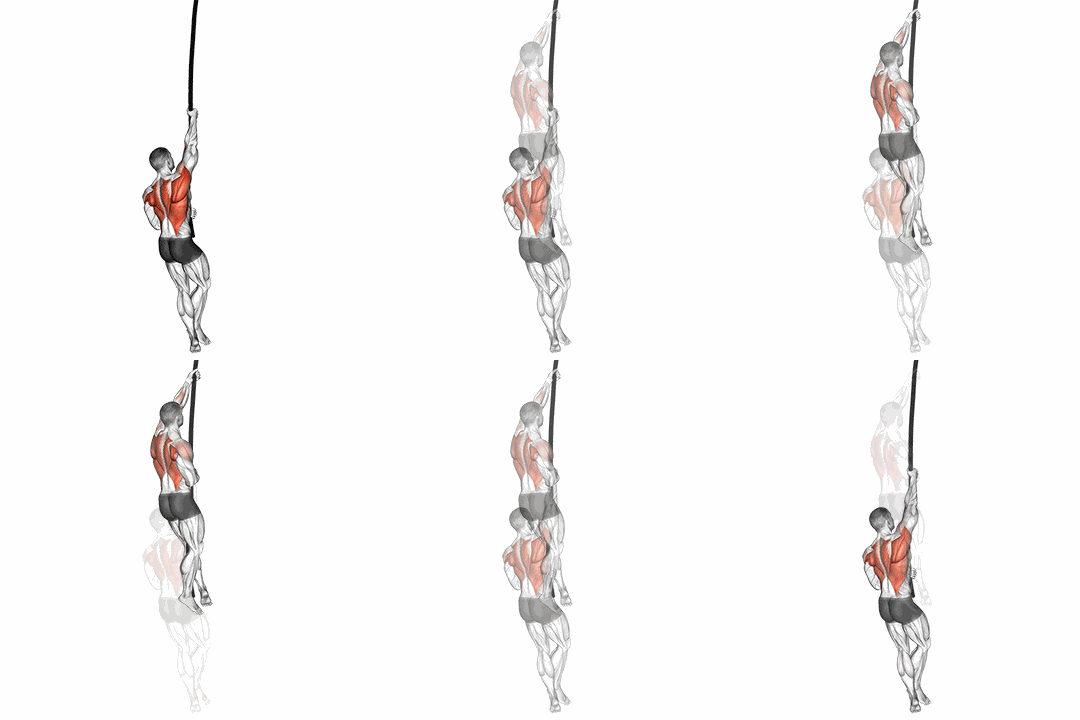
What is the rope climb?
The rope climb is exactly what it says: you climb a hanging rope, usually 4.5 to 5 metres, touch the top and come back down under control. Done right, it is a leg exercise wearing a back exercise's clothes: the foot lock pinches the rope so your legs push you upward while the arms mostly hold position and re-grip. Done wrong, it is an arms-only grip massacre. It trains grip endurance, lats, biceps and hip flexors together, which is why CrossFit and obstacle racing lean on it. You need a rope; chalk helps, and long socks save your shins.
How to do the rope climb
- 1
Jump and hook
Jump as high as you can, grab the rope with hands stacked, and lift the knees right away. Guide the rope around the outside of one foot so it crosses the top of that shoe, then stamp the other foot on top: the rope is now pinched between your feet.
- 2
Stand up on the lock
With the pinch solid, push through the legs exactly as if standing out of a squat. As the hips rise, slide the hands up the rope one over the other.
- 3
Re-grip high, re-lock, repeat
At full standing height, grip as high as you can reach, pull the knees to the chest while the feet loosen just enough to let the rope slide, then clamp again. Each cycle should buy close to a metre.
- 4
Descend hand under hand
Never slide. Loosen the foot lock into a brake, move one hand below the other, and let the feet control the speed all the way until both land on the floor.
Pro tip
Set the foot lock at the top of your jump, not after hanging around thinking about it: a high jump plus an immediate lock saves a full pull on every climb. Then learn to trust the lock: on your first climbs, pause with straight arms and loose hands for a second. If it holds your weight, your legs, not your grip, will run the ascent.
Common mistakes
Climbing with arms only.
If your forearms are cooked after two climbs while your legs feel nothing, your foot lock is decorative. Drill the lock at ground level until standing on it feels like standing on a stair.
A lock that slips mid-climb.
A loose pinch forces a panicked re-grip halfway up. Before full climbs, rehearse jump-lock-stand-hold for several reps; the top foot must press down hard on the rope crossing the bottom shoe.
Sliding down the rope.
A sliding descent burns hands and shreds skin, and torn palms end training weeks. Come down hand under hand with the feet braking; speed on the way down is earned long after the skill is automatic.
Starting a climb on a cooked grip.
The dangerous half of a rope climb is the way down, and it arrives when you are most tired. In workouts, break before your forearms force you to; never start the last pull to the top if you doubt the descent.
Variations and progressions
Easier
Floor-to-stand rope pull
Sit on the floor under the rope, grip high and pull yourself to standing, then lower back down with straight legs. It builds the pulling and grip base with zero fall risk.
Harder
Legless rope climb
Arms and core only, legs in a pike or an L-sit. The pulling demand jumps to another category: own 8-10 strict pull-ups and several easy standard climbs before trying one.
Alternative
Towel pull-up
Drape two towels over a bar and grip one in each hand. It copies the thick, vertical, crushing grip of the rope without needing a ceiling anchor, and it humbles strong pull-up numbers fast.
How to program it
Three protocols by goal. Pick one per cycle and aim for progression on load or distance.
| Goal | Sets × distance | Load | Rest |
|---|---|---|---|
| Skill (learning the lock) | 10 min of lock drills, then 2-3 climbs | Bodyweight, full focus on the feet | As needed between attempts |
| Capacity | 5 × 2 climbs | Bodyweight, crisp technique every rep | 2-3 min |
| Conditioning (WOD) | 1-2 climbs per round | Bodyweight, break before grip fails | Next station |
Rope Climb FAQ
How do I protect my hands and shins on rope climbs?
Most of the damage comes from one habit: sliding down. Descend hand under hand with the feet braking and your palms will last. For the shins, long socks or leggings take the friction instead of your skin, which is why you see them on every competition floor. Chalk improves the grip without numbing the feel of the rope the way thick gloves do.
J-hook or Spanish wrap: which foot lock should I learn?
The J-hook (rope around the outside of one foot, clamped by the other) is fast to set and release, which is why it dominates CrossFit workouts. The Spanish wrap spirals the rope around one leg and over the foot: more secure, easier to rest on, but slower and harsher on the shin. Learn the J-hook as your default and keep the wrap for long climbs or when you need to park mid-rope.
Do I need strict pull-ups before trying a rope climb?
Less than you think. With a solid foot lock, the legs carry most of the ascent, so one or two strict pull-ups' worth of strength plus a confident dead hang is enough to start on a low rope. What you genuinely need first is the lock itself: drill jump-lock-stand at ground height until it is boring. Legless climbs are a different story and want 8-10 strict reps behind them.
How tall is a standard rope climb?
The common competition standard is about 4.5 metres (15 feet) from the floor to the touch point, and most gym ropes hang in that range. If your ceiling is lower, count two short climbs as one, or do floor-to-stand pulls for volume. The height matters less than the rule you climb by: every rep ends with a controlled descent, whatever the rope measures.